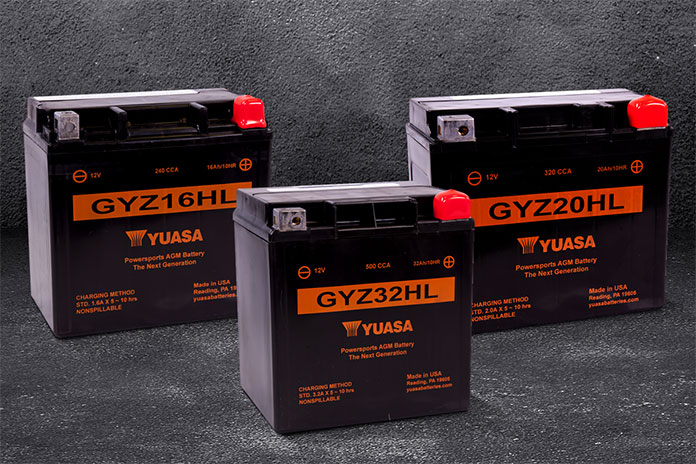
Yuasa has been manufacturing powersports batteries, including motorcycle batteries, in the United States since 1979 and is a leading supplier of OEM batteries for many motorcycle manufacturers. Yuasa says the reason is simple: Its premium-quality batteries provide unmatched reliability, long life, and advanced engineering with years of application experience.
Yuasa is best known for its high-performance Absorbent Glass Mat (AGM) batteries, which are maintenance-free, compact, and lightweight, and they provide high cold cranking amps (CCA), making them ideal for motorcycle applications.
Prices vary depending on battery performance and fitment.
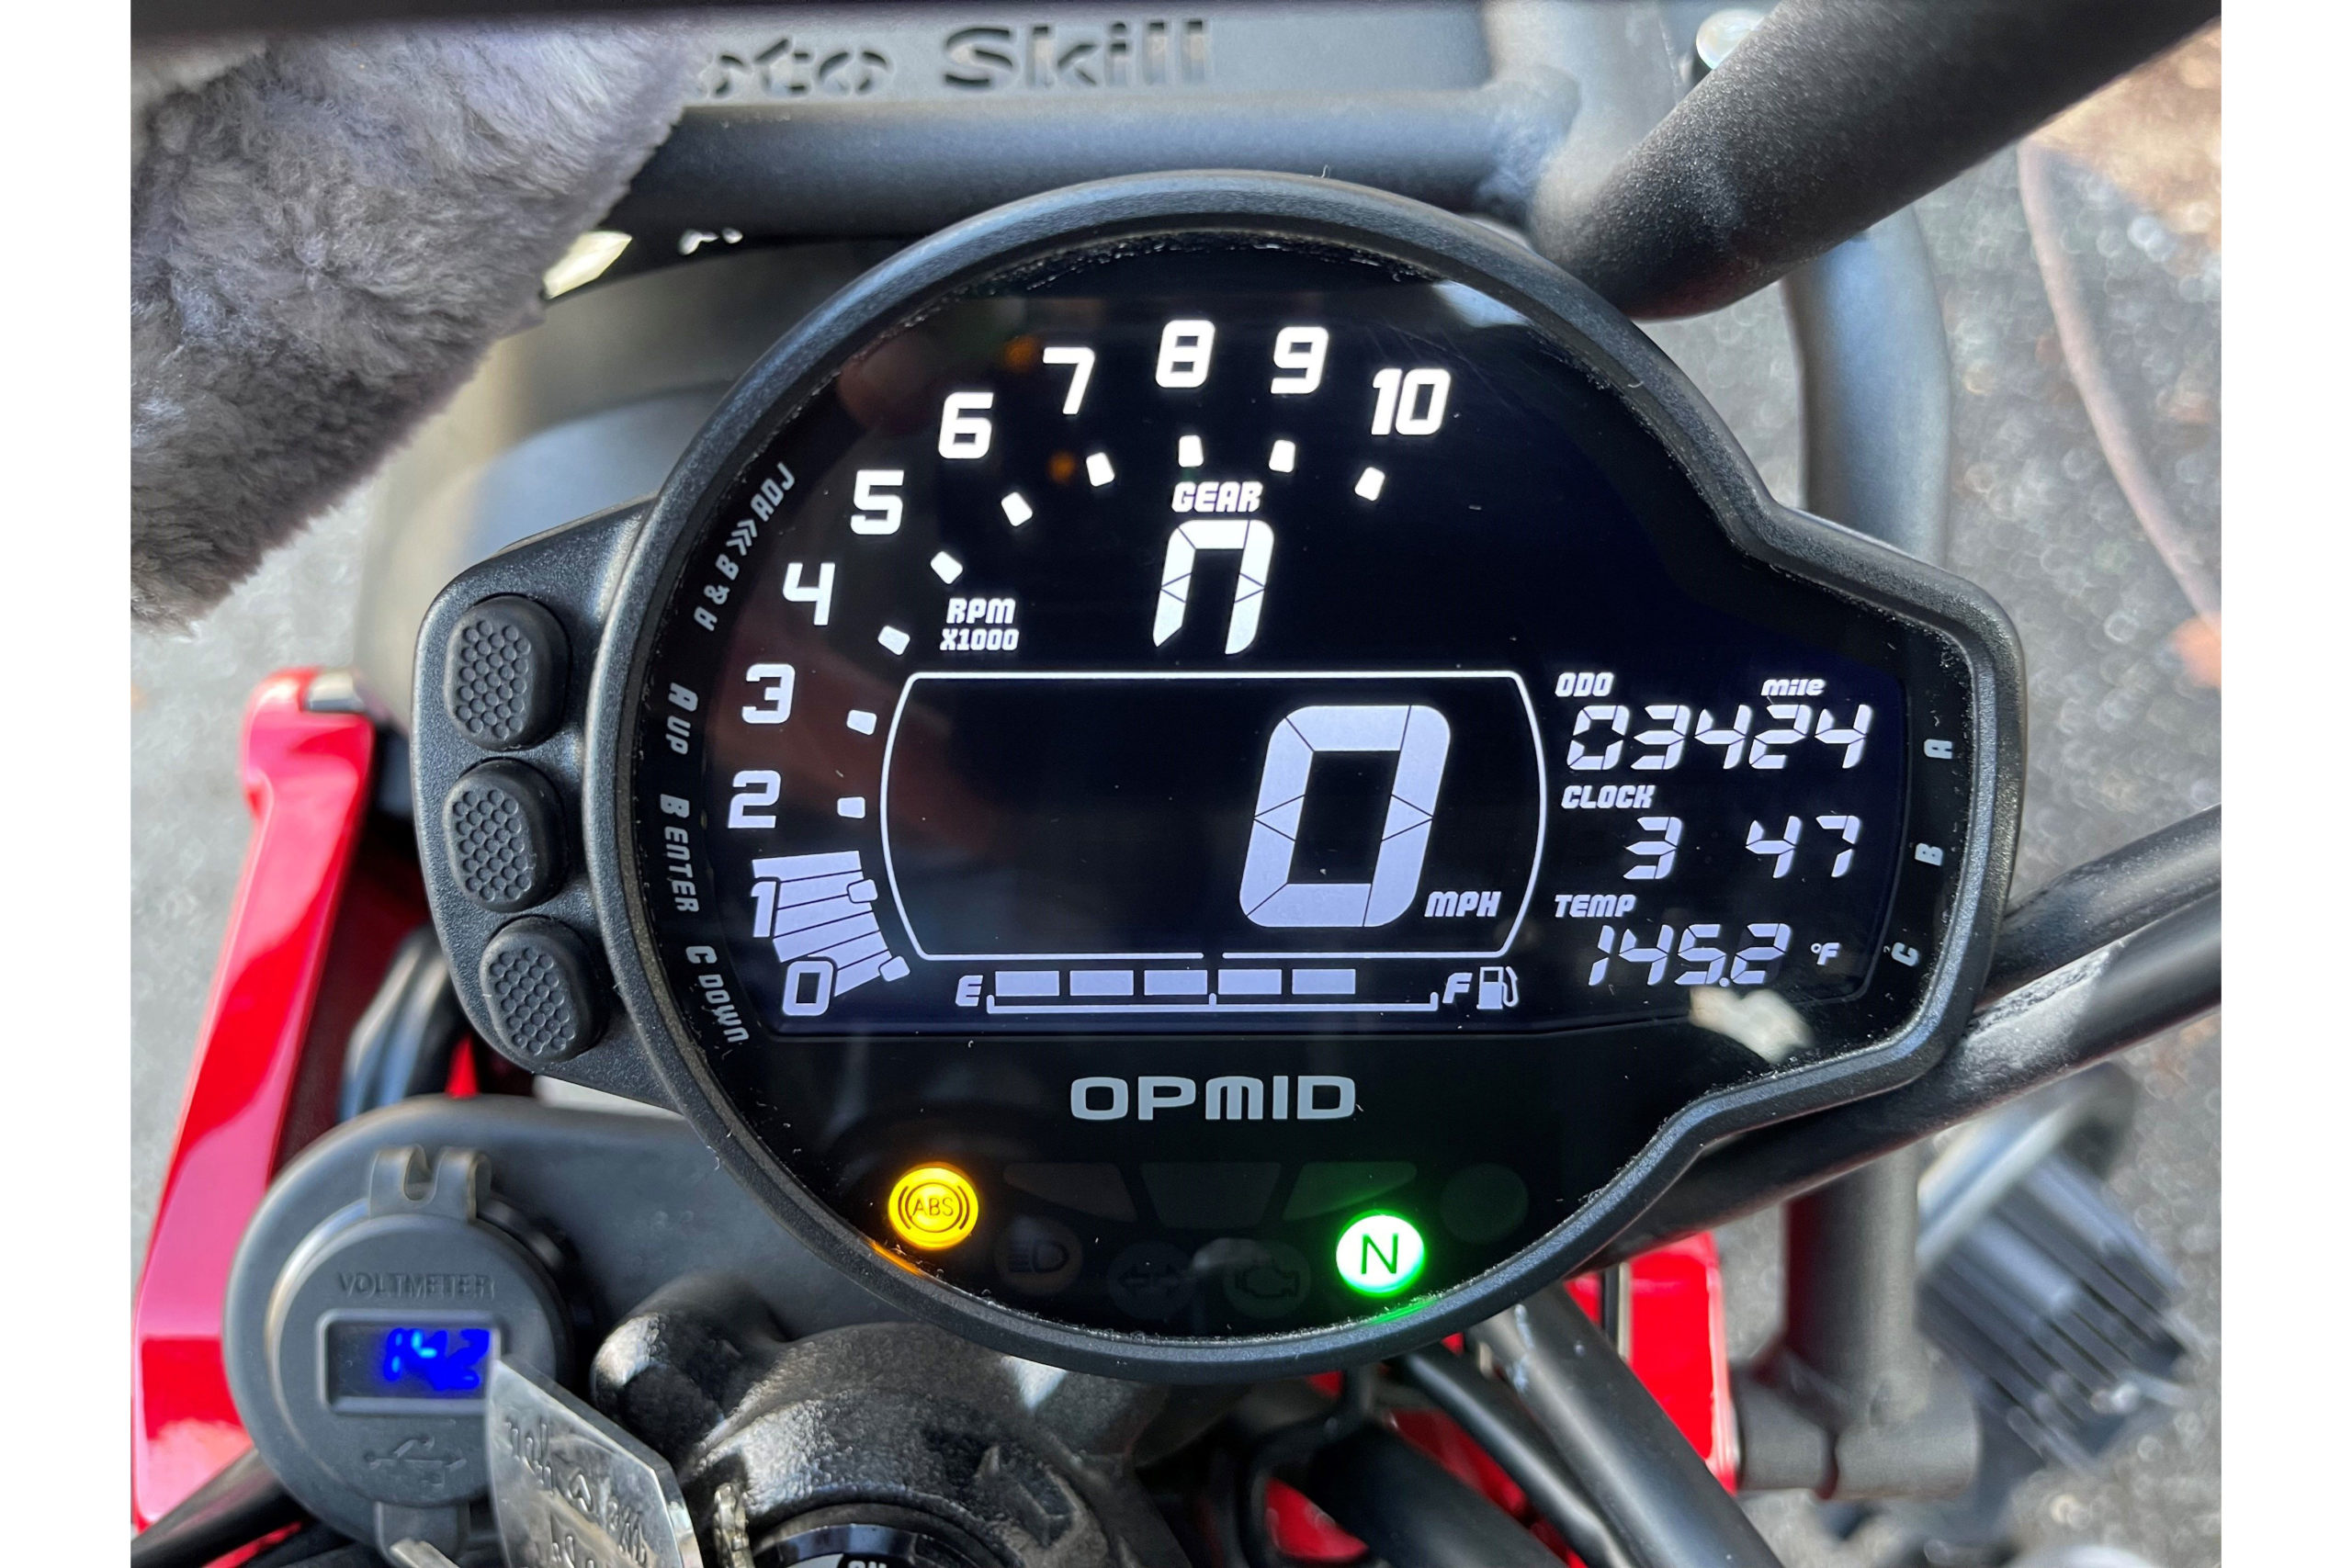
Opmid’s M1204 Multi Meter is a direct plug-and-play replacement for the stock gauge cluster on 2019-and-newer Honda Monkey and Trail 125 models, and it alleviates the two most common complaints about the OEM setup. First, unlike stock, the Opmid’s adjustable backlighting is very bright and visible in all conditions, including direct sunlight. Second, gauge functionality is vastly improved, providing the rider with a wealth of information and customization not available on the factory cluster.
Installation on my 2021 Honda Trail 125 was very straightforward using the included harness. Opmid’s 10-minute installation video (on YouTube) was comprehensive enough for any reasonably competent DIYer to get the job done in 1-2 hours with hand tools. To begin, the stock gauge cluster is removed, and the new meter’s 5 x 3.9 x 2 inches (WxHxD) chassis drops into place. The only tricky part on the Trail is removing the body panels for the first time, since they utilize delicate tabs which can easily break if forced, but the video helps in that regard as well. (The Monkey’s installation is less painful than the Trail’s, since there are fewer body panels to deal with.)
Once the panels are out of the way, the intake snorkel is removed to allow access to the area beneath, and from here the wiring job begins as the Opmid’s main harness is laid out carefully and zip-tied into place. It plugs directly into the gauge cluster’s sub-harness, stock temperature sensor, and ignition coil. Check that there’s adequate cable slack as the handlebar is turned left to right full lock.
When the Opmid is first powered on, there’s some programming to input front and rear sprocket sizes, rear tire diameter, and the initial value of the odometer (take a picture of your stock odo before removing it, for reference). All the stock figures to input are in the installation videos, but it’s nice to see that the device can be customized for different sprocket combos and wheel sizes as necessary. Once that’s finished, just button everything back up neatly and go for a test ride.
Out on the road, mini-moto riders will be grateful for the upgrade from the dim, spartan stock display. With the M1204 now installed, the rider has the following information readily available (some of which is customizable): speedometer, tachometer, odometer, A/B tripmeters, clock, gear indicator, shift light, fuel gauge, oil temp, voltmeter, oil temp warning alarm, speed warning alarm, oil change reminder, hour meter, and max records (speed, RPMs, and oil temp).
Many of the settings are adjustable if you get into the weeds with programming, but for most Trail and Monkey riders, the primary benefits are the addition of the tach, the gear indicator, and the oil temp reading. The rest is icing on the cake, but it all adds to a more enjoyable riding experience on these pint-sized Hondas.
Back when I lived in Philadelphia, I rode around the city with a 15-pound Kryptonite chain slung over my shoulder like a bandolier. When I needed to park my motorcycle, I’d find a spot near a big post and shackle the rear wheel with the chain. Those were simpler days, when phones were dumb and Mark Zuckerberg was still picking his nose in grade school.
Now, like everyone, I carry a smartphone in my pocket wherever I go, allowing the Four Horsemen of the Apocalypse (Amazon, Apple, Facebook, and Google) to track my every movement and activity. But hey, it’s a worthwhile tradeoff. I get to doomscroll or watch funny cat videos instead of having to endure a single moment of boredom ever again. LOL, j/k.
Just as the REVER app on my iPhone means I no longer need to mount a dedicated GPS on my bike, the Monimoto GPS tracking app means I can leave the Kryptonite chain at home.
Inside the box is the Monimoto 7 tracking device, which measures roughly 3.5 x 2.5 x 0.75 inches – smaller than a deck of cards and compact enough to fit under a motorcycle seat. There are also two AA lithium batteries to power the eSIM-enabled tracking device, two releasable zip ties for securing the device to the motorcycle, and a round key fob (1.6 x 0.4 inches) powered by a thin watch battery.
Installation is easy. Download the Monimoto app, follow the instructions to pair your phone with the tracking device, secure the tracking device under the seat, and attach the fob to your keychain. The app lets you know that the device is armed and ready.
If your motorcycle and the tracking device part ways with the fob and movement is detected, the Monimoto app sends an alert notification and an automated phone call that says “Alarm!” Then, the app keeps you updated and provides GPS coordinates for your motorcycle that are viewable on a map. If your motorcycle has indeed been stolen, you can share the tracking data with police. If the fob was on the motorcycle when it was stolen, you won’t receive alerts but you can start active tracking via the app.
The Monimoto 7 is easy to use and provides peace of mind. It uses the LTE-M (LTE Cat-M1) network, and currently works only in the U.S. MSRP for the Monimoto 7 is $199. It comes with an embedded eSIM card and a free 2-month subscription; after that it’s $49/year.
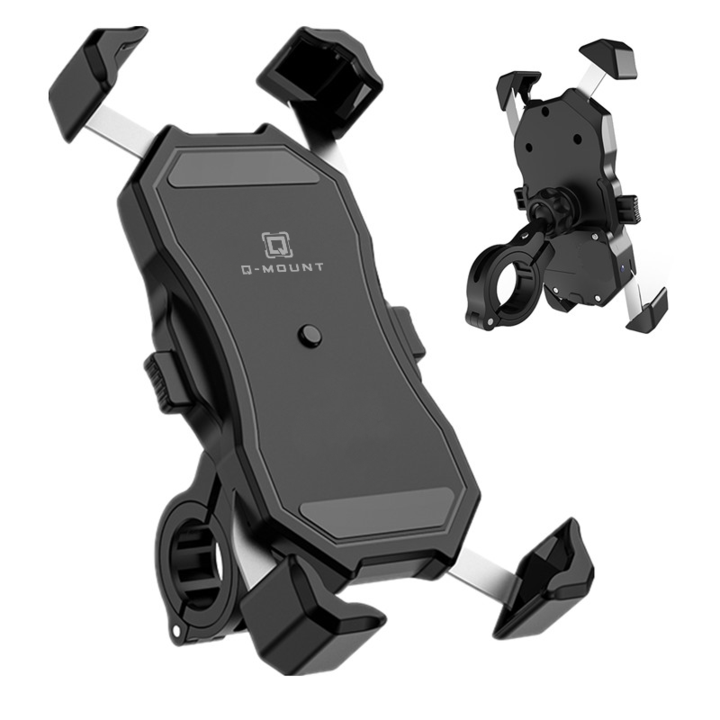
For riders who prefer to use their smartphones for navigation, music, and other functions, mounting and charging while on the go are primary concerns. For obvious reasons, mounts used on motorcycles must be extra secure, as dropping the phone at speed could prove catastrophic. Likewise, wireless charging is a far more convenient option than plugging in, especially in inclement weather.
The Q-Mount Pro combines solid mounting and wireless charging into one IP67-rated weatherproof package, which boasts true one-handed operation for both locking and releasing the phone. Squeezing the two “quick access switches” on the sides of the mount chassis extends four stainless-steel expansion arms outward to approximately 7.25 inches diagonally, enough to easily hold a typical smartphone with a 6.5-inch screen and then some. My test subject was an Apple iPhone 12 Pro Max inside an Otterbox Defender case, which is about the largest rig you can fit within the Q-Mount Pro.
Once the phone is placed flat on the mount’s soft silicon mats, it depresses the center button which actuates a spring mechanism, snapping the expansion arms inward to pull tight onto the four corners of the phone. The phone is now firmly locked into position until the quick access switches are pressed in again to release it. The expansion arms have oversized plastic tips that accommodate phone cases up to approximately 0.5 inch thick like the aforementioned Otterbox, so there’s no need to remove the phone from the protective case to mount it.
The device features a waterproof rocker switch on its rear side that allows the user to toggle between off, Qi wireless charging at 15 watts max, and USB 3.0 charging via a waterproof covered port at the bottom of the Q-Mount’s chassis. USB output is 5V/3A, 9V/2A, or 12V/1.5A. A power indicator LED on its left side lets you know if there’s juice available.
Installation is very simple using the included handlebar mount, which utilizes a ball end to interface with the phone mount chassis, allowing a wide range of adjustment. Once locked in place, the setup is solid and simple to operate with one hand. A mirror mount is also included for even more placement options, though we were happy with mounting to the handlebar.
Wiring is direct to the bike’s 12-volt DC power source, using the included hardwired harness.
Consult Q-Mount’s website for a comprehensive list of which phones are compatible with Qi wireless charging; nearly every major brand of phone is covered.
In short, the Q-Mount Pro is a functional, inexpensive device that enhances convenience for mounting and charging a smartphone on the fly. MSRP is $45, which includes free shipping.
Wunderlich Navigator Lock secures the GPS on 2014 and newer BMW R 1200/1250 RT motorcycles equipped with factory central lock system.
BMW’s liquid-cooled R 1200 RT and R 1250 RT models are available with a factory installed GPS mount ideally positioned at the top of the instrument panel. To install your BMW Navigator 4, 5 or 6 GPS, you just push it in place…click. To remove it, you push a release button on the side of the binnacle. But that convenient push-to-release feature also puts your GPS at risk for a quick crime of opportunity by a passing scofflaw. Of course, you can just take your GPS with you or lock it in a pannier whenever you leave the bike unattended, but that’s a hassle, especially when touring.
Your humble scribe is not the only RT rider who’s wondered why BMW didn’t include some way to lock the GPS in place, especially on RT’s like mine equipped with central locking that secures both panniers, both fairing pockets and the top case, by pressing a button on the remote or the handlebars. Now Wunderlich offers the Navigator Lock for 2014 and newer RT’s. It’s a mechanism powered by a servomotor that disables the navigator release mechanism when you activate the bike’s central lock system. The servomotor attaches neatly out of sight, beneath the bike’s nosepiece, and plug-and-play electrical connections piggyback off the actuator for a fairing compartment lock. Accessing the space to install the unit and make the connections is a straightforward job following the supplied instructions. Here are a few observations for the installation:
The RT’s GPS release button (red arrow) is the object of the Wunderlich Navigator Lock. When the bike’s factory central lock system is engaged, the button is mechanically disabled, securing the GPS in its mount. When central locking is disengaged, the release button works.
After removing the windscreen and nose piece, the frame of the Navigator Lock slots in behind the GPS mount and, with a little coaxing, over two plastic nibs on the nose piece. It’s not going anywhere. The actuator aligns with an opening and, once deployed by engaging the central lock system, mechanically disables the GPS release mechanism. The right audio speaker gets in the way of wire routing, so remove the grill and the speaker itself, then route the lock’s power cord down through the opening.
The Navigator Lock fits neatly underneath the RT’s nose piece.
To source power and the bike’s central locking system, the side panel must come off. If you haven’t removed the side panel before, look up the procedure in your owner’s manual. Do it wrong and you may snap off the side panel’s fragile mounting tabs. After removing the screws from the panel’s inner side, gently pull the panel outward until the male pins pull out from the female rubber mounts — and no farther. Next, gently push the panel in a 10 o’clock direction (looking at the bike from the right side) to separate the tabs from their slots on the adjoining panel. When routing the lock’s power cord down the side, don’t be confused by the bars in the drawing, which are Wunderlich tip-over protection.
Plug-and-play wiring piggybacks off the right fairing pocket lock actuator.
Disconnect the OEM plug as shown, then insert the two connectors into the two mating plugs from the Wunderlich wire harness. In the USA, top-of-the-line RT’s with central locking typically also have Sirius satellite radio. The satellite antenna must be removed from its mounting bracket and placed on the frame of the Wunderlich lock on a pre-mounted adhesive pad. I found an old set of feeler gauges were rigid enough to cut through the adhesive and flexible enough to not damage the antenna. You’ll have to remove the OEM antenna bracket, as the Navigator Lock needs to occupy that space. This step wasn’t in the supplied instructions, but it became clear during reassembly that the bracket had to go. Pull up at either end and wiggle it out. Peel off the release paper to expose the new adhesive on the Wunderlich frame and stick on the antenna. Test the Navigator Lock to confirm it works, then button everything back together.
The Wunderlich Navigator Lock works as described, disabling/enabling the RT’s GPS release mechanism using the bike’s central locking feature. For $219.95 and a couple hours in installation time, you get a handy and worthwhile feature that BMW should have provided in the first place.
Should you crimp or solder your connections? A reliable joint can be made with either method if the proper technique is used. Soldering kits are cheap and the process is easy to master with some practice. Photos by the author.
Adding electrical accessories to your bike is an age-old custom for street and touring riders. Heated grips, fog lights, USB charging ports, GPS systems, sound systems, gear-position indicators and auxiliary brake lights all add to our comfort, enjoyment and safety out on the road. All of these devices need power, however, and it’s important that any electrical connections you make are done properly and that your bike’s charging system is up to the task.
Before you ask anything more of your motorcycle’s electrical system (it’s already supporting a headlight and taillight, fuel pump, gauges, an ignition system, and the occasional turn signal, brake light and horn) you’ll want to verify the health of your battery. A good place to start is by checking the resting voltage with a multimeter. Despite being a “12-volt” battery, it should actually show closer to 12.6 volts when fully charged, with 12.0 volts correlating to an unhealthy 50-percent state of charge.
Proof that Iron Butt Rally riders are either completely loco or some of the most resourceful long-distance strategists on the planet. This rider has used the Farkleshelf for the Honda GL1800 Gold Wing from Firecreek Accessories (firecreekacc.com) along with some ruthless ingenuity to connect and support a redundant array of GPS units, satellite communicators and half-a-dozen electronic devices we can’t even identify.
Modern absorbed glass mat (AGM) and gel batteries have a lifespan of about four to seven years, so you would be wise to swap it for a fresh one if it’s getting on in years. If there’s any corrosion on the terminals, remove the battery and scrub the lugs with a wire brush and a one-to-one solution of baking soda and water. It’s important to keep those terminals nice and clean to reduce resistance to current flow.
Next, you’ll want to make sure your bike’s charging system is doing its job by checking the voltage at the battery with the bike running at about 3,000 rpm. You should see 14.4 volts or more. Verifying that your charging system has enough surplus wattage is a good idea if you intend to run especially thirsty accessories like head-to-toe heated apparel, but alternator output can be an elusive or nonexistent spec in the owner’s manual. Thankfully, most modern charging systems have plenty of strength to support your bike’s vitals plus another 100 or so watts’ worth of accessories.
If your new farkle is a factory part, it’s possible that the manufacturer has already provided an electrical plug to power it. Check your fuse-box lid for an “aux” circuit and reference your owner’s manual for the plug location. (Hint: It’s often under the seat or behind the dash.)
Without a factory connection, the easiest way to power your new gadget is to tap right into the battery. While this may be convenient, bolting up to the lugs poses two major problems. For starters, there’s only room for a few ring terminals before those battery bolts run out of thread, so if you’re aiming to add more than one or two accessories you may not have room. Second, there’s the very real possibility of draining every available volt out of the electrolyte if you were to say, leave your heated grips on accidently after parking the bike for the night. You think you’ll never forget to turn ’em off, but when you eventually, inevitably do, your battery is going to be as useless as a brick when you come back to the bike.
A better alternative is to use switched power, so current only flows when the key is on. Tapping into the headlight or taillight wiring will work for low-draw items like a cellphone or GPS charger, but if you ask too much of an existing circuit you’re liable to blow a fuse.
So why not run dedicated, switched, fused circuits for accessories? The best way to do that is with a relay and a fused distribution block, both of which can be sourced at your local autoparts store or purchased as a single, integrated unit from companies like Twisted Throttle, Aerostich, Centech and others. With a relayed setup your accessories will only pull power when the key is on, and using a distribution block allows you to easily add or remove accessories, consolidate wiring and keep your battery top tidy.
However you decide to pull power, it’s critical that the new component be fused to protect both the accessory and your bike’s wiring. Push too much current through an unfused connection and things may melt or even catch fire. Good grounding is another key consideration for any electrical component. You can connect to the main chassis ground, tap into the wiring harness or connect directly to the battery’s negative terminal.
It’s gotta be fused! Fuses are a critical safety feature that protect your bike’s circuits from being overloaded. Every accessory you install should incorporate a fuse of the appropriate amperage.
Speaking of the negative terminal, disconnecting it is the first thing you should do when working on your bike’s electrics and the last thing you should reconnect when you’re done. With the negative terminal unplugged there’s no risk of a sparks show if a live wire touches the frame or your wrench slips while fiddling with the positive terminal.
Finally, it’s important to ensure that any electrical connections you make are secure and well insulated. Shield bullet and spade connectors with rubber boots or plastic covers, and use heat-shrink tubing for any soldered joints. Don’t be tempted by electrical tape — the adhesive often fails after just a short time, exposing wiring and making a sticky mess.
Vampire clips (top) and Posi-Taps (bottom) are two common ways to tap into wiring. Posi-Taps, while usually a special-order part, provide a more secure connection and are less likely to sever the wire.
Electrical accessories can keep you warm when the weather is miserable, provide a soundtrack for your journey, make you more visible on the road and improve your riding experience in numerous other ways. Outfitting your motorcycle with the latest farkles is a time-honored tradition, and if you follow these tips and precautions you’ll be powered up in no time.
By now most of us know the chief advantages of lithium motorcycle batteries – much less weight than lead-acid batteries, slower discharge and no sulfation from sitting being the top three. Of course, lithium (technically lithium iron phosphate, or LiFePO4) batteries are still quite expensive, so most riders simply take the cheaper path when it’s time to replace. That was my intent when I started looking for a battery for my 1982 Yamaha Seca XJ650, but as with some of my other old bikes the choices are very limited. I certainly didn’t want one of the flooded (conventional) batteries available – having to maintain water levels in a battery on a maintenance charger is a pain – and the one maintenance-free AGM battery I could buy was the same one that I was replacing, which only lasted two years.
Which brings me to a fourth, lesser-known advantage of lithium batteries – you can almost always find one that will work in your bike, even vintage machines like my Seca. With four times more capacity per cell than a lead-acid battery, a lithium battery can be smaller than stock and still pack the cranking power your bike needs. As long as the positive and negative terminals are in the right places and the bolt holes are correctly oriented, you can find one to fit in your bike’s battery box, perhaps with some padding around it to snug it in place. The only limitation may be if your older bike’s charging system doesn’t put out enough juice to keep the LiFePO4 battery charged – at least 13.1 volts at idle and 13.6 at speed.
Shorai makes nearly two-dozen 12- and 6-volt lithium batteries in a variety of case shapes and sizes, capacities and right/left polarity options to fit street, dirt, touring and cruiser motorcycles, scooters and ATVs. They can also be used for custom bikes up to 110ci or 1,800cc, and vintage machines. Turns out the Shorai LFX14A5-BS12 battery for my Seca is a perfect fit in its battery box and didn’t need any padding, but it still came with several square feet of self-adhesive foam in different thicknesses for other battery boxes. LFX batteries come with bolt holes on the top and sides of the terminals, so installation was a snap, and the best part is that the 2.3-pound Shorai LFX14A5-BS12 is 4.5 pounds lighter than the lead-acid YB12A-A that came out of the bike.
Lithium batteries offer several other advantages. In addition to operating at a higher voltage than lead-acid (so they can potentially provide faster cranking and easier starts), in older bikes with no parasitic battery drain from clocks, computers, alarms, etc., the Shorai can hold a charge up to a year. On later machines, if you don’t ride it at least twice a month, then you should charge the battery every few weeks. Shorai recommends using its BMS01 charger because it offers Charge, Store and Diagnosis modes, balances the cells individually for peak performance and can be used long-term. But Shorai’s LFX batteries can also be charged with a regular maintenance charger with automatic cutoff as long as the battery is disconnected from the charger once it’s fully charged.
Shorai LFX batteries range in retail price from $99.95 to $329.95 and come with a limited 5-year pro-rated warranty. The BMS01 charger goes for $99.95.
For more information, see your dealer or visit shoraipower.com.
Cardo’s new Packtalk Bold features DMC mesh communication technology, Natural Voice Operation and audio by JBL. Photos courtesy Cardo.
Wireless communication devices (we can’t just call them Bluetooth anymore) are getting better and better. Think of your biggest complaints about them just five years ago…the list probably included difficult and/or unreliable pairing, especially in groups of three or more; poor connectivity over distances and in areas like tight canyons; controls that are hard to use with gloves on and horrible audio quality.
I’ve been testing Cardo’s new top-of-the-line Packtalk Bold and have good news: you can probably cross all of those issues off your list. Is it perfect? No, but technology seldom is. Is it the best such device I’ve tested thus far? Yes. Is it worth the $339.95 retail price? Only you can make that call. To help you along, here is my take.
The Packtalk Bold replaces the Packtalk, which was Cardo’s first DMC mesh communicator (read our review here), and it has three noteworthy features: mesh technology, voice-activated operation and a JBL audio system. We’ll start with the mesh.
Raise the antennae as shown to maximize DMC mesh range.
Mesh technology is the next generation in bike-to-bike communication; rather than connecting in a relatively simple Bluetooth “daisy chain” that means just one lost connection breaks apart the whole group, DMC connects a group in something like a web. Riders can come and go, disconnecting and reconnecting at any time, without affecting the rest of the group.
This is especially helpful on group rides when you might get spread out over many miles, or when you head into a tight canyon and slower riders fall behind. On our first test ride with the Packtalk Bold, my group of seven riders got split into three and four on Latigo Canyon Road, a notoriously tight, technical route. As the three of us in the lead pulled ahead and the walls of the canyon closed in, the remaining four were disconnected.
The cool thing was, both groups could still communicate amongst themselves. Then when the back four caught up, they automatically reconnected with us and presto! We were one big happy riding family again. This continued throughout the day, with no buttons to press and no fussing with re-pairing at stops. At the end of the day, one rider and I split off from the main group to head home, and even after we rode out of range and disconnected from the group, she and I were able to chat until we eventually rode our separate ways. Cool!
The Packtalk Bold is made for group communication. It’s easy to pair, connects and reconnects seamlessly and has decent audio to boot.
The initial pairing process was pretty simple as well. After we all entered DMC pairing mode, the group “admin” pressed one button and we stood in a circle, holding our helmets close together. One by one the flashing green lights turned purple, which meant pairing was complete. From that point on, until we remove ourselves from the group via the Cardo app or reset our units, our Packtalk Bolds will remember this group and automatically reconnect if we ever have occasion to ride together again.
While the Packtalk Bold features DMC mesh technology, it also has Bluetooth capability and can be paired to Cardo or other brands’ Bluetooth communicators. It also uses Bluetooth to pair to a GPS, motorcycle or phone.
Private conversations with another mesh group member (like your passenger) require the app, or by pairing with them in advance separately using Bluetooth, then you can both press a couple buttons on each unit and temporarily check out. You can also mute yourself from the entire mesh group if you wish.
The second neat-o feature is what Cardo calls Natural Voice Operation, meaning the rider can leave his/her hands on the grips where they belong and operate the Packtalk Bold with voice commands. The feature is always on, so at any time you can say, “Hey Cardo,” followed by the command: “volume up,” “mute audio,” “music on,” “next track,” even “battery status.” It even allows for “Hey Siri” and “OK Google” commands to your phone. I found it worked great as long as I spoke at a normal level; shouting distorts your voice so it doesn’t always get recognized.
Neat-o feature number three addresses the tinny sound quality we’ve come to expect from helmet communication systems. Cardo partnered with higher-end speaker manufacturer JBL to tune the Packtalk Bold’s audio performance for use specifically in a motorcycle helmet, an industry first. The JBL speakers are considerably larger in diameter and a bit thicker than the previous Packtalk’s, meaning placement directly over your ears might be a bit tough depending on how much space your helmet allows. That said, they fit snugly into the cutouts in my HJC i70 full-face and were positioned fairly well.
Comparison of the previous generation Packtalk speakers (left) with the new JBLs (right). Photo by the author.
As with just about everything nowadays, you’ll need to download the free Cardo Connect app for your phone in order to make the most of your Packtalk Bold, including setting volume levels for things like music, system prompts and intercom, adjusting the sensitivity of the automatic volume control (which adjusts volume based on ambient noise) and choosing regular, bass boost or vocal EQ profiles from the JBL sound system. I chose bass boost since that’s my primary complaint about in-helmet audio, and when compared back-to-back with the previous Packtalk’s speakers the JBLs are a marked upgrade. Low-end was fuller but the midrange was also more fleshed out, giving me a more pleasurable music experience.
Notably, owners of the previous Packtalk can purchase the JBL sound upgrade for $89.95, which includes the speakers as well as a software update.
The Packtalk Bold’s shortcomings are few: while “Hey Cardo” commands worked every time, I found “Hey Siri” to be less reliable, and the maximum volume level, even with the JBLs, is not quite loud enough for freeway speeds. “Audiophile” earplugs like these from Etymotic rather than traditional foam plugs might help.
Otherwise this is a well-designed, highly functional helmet communicator that really steps up the game. A Duo pack is available as well, with two pre-paired units for $599.95.
For more information, see your dealer or visit cardosystems.com.
Cardo’s Packtalk Bold is the best helmet communicator the author has tested thus far. Photo by the author.
There’s nothing like a long, leisurely scenic motorcycle ride. Blue skies, warm air, engine rumbling between your knees and smooth, serpentine pavement unfolding before you. What can make a great ride even better is a good soundtrack, tailored to your mood. Perhaps classic rock for a touch of fist-pumping nostalgia, or ’70s soul to lift your spirits.
Whatever tunes you choose, they’ll sound better with in-helmet speakers. Installing a Bluetooth helmet headset isn’t particularly hard, but it can be fiddly. And then you usually end up with a small box clipped to the outside of your helmet, which can be unsightly and vulnerable (I’ve seen more than one unsecured communicator fall off a helmet at speed and bounce into oblivion).
Sena, the Korean maker of Bluetooth communicators and action cameras, now offers “smart” helmets with communicators integrated right in. Speakers are pre-installed and the control buttons are built into the side of the helmet, giving it a clean, cohesive look.
Sena’s Momentum helmet has the same features as its 20S communicator, which offers intercom connections with up to seven other riders and includes Advanced Noise Control technology (reduces background noise during intercom conversations), built-in FM radio, voice commands, hands-free phone calls, audio multitasking and more. (You can read our review of the 20S here; for a full list of features, see Sena’s website.)
Pairing devices to the Momentum is straightforward, audio quality is good and connecting to the Momentum with Sena’s smartphone app makes it easy to adjust settings, set speed dial and FM station favorites and create intercom groups.
The Momentum has a composite fiberglass shell with crown and chin intake vents and a rear exhaust vent, a multi-density EPS liner, a scratch- and UV-resistant quick-release face shield that’s Pinlock ready (insert sold separately) and a removable, washable comfort interior.
At 3 pounds, 11 ounces for a size medium, weight is average, and the helmet is acceptably quiet and reasonably comfortable, on par with other mid-priced helmets. The neck roll is tight, which helps keep wind noise down but creates challenges when donning and doffing the lid.
All Sena Momentum helmets are available in glossy white or matte black in sizes XS-XXL. The Momentum retails for $449. The Momentum Lite helmet, which can connect with up to three riders, retails for $399. And the Momentum INC helmet, which adds Intelligent Noise Control noise-cancelling technology, retails for $549.
The Momentum Pro, which adds Sena’s QHD camera integrated into the top of the INC-equipped helmet, should be available soon. We’d love to see more colors/graphics and a modular helmet option.
For more information, see your dealer or visit sena.com.