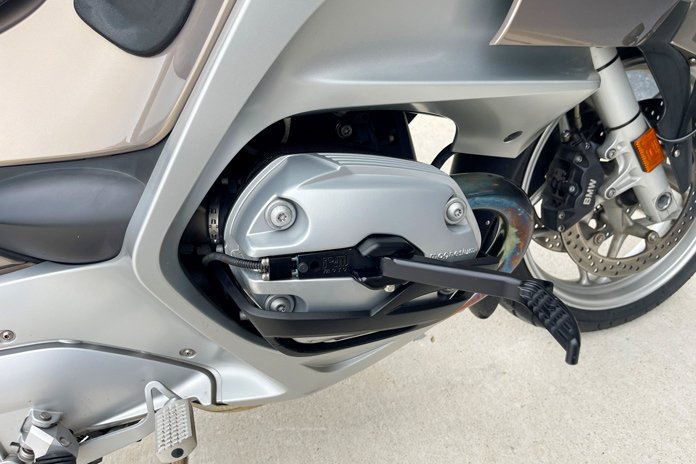
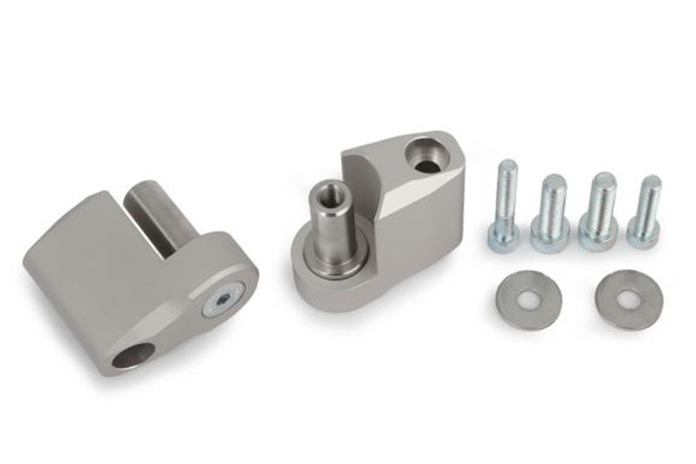
The IRM Moto Sahara highway pegs are simple to install and provide comfort for long-haul riding.
The IRM Moto Sahara highway pegs add a new dimension of sleek aesthetics and functionality to the usually dreary task of finding an alternate place to rest your feet on long rides. These pegs are designed to mount to the valve covers on BMW’s 2005-2009 Hexhead R-Series models, such as the R 1200 RT, R 1200 R, and R 1200 GS.
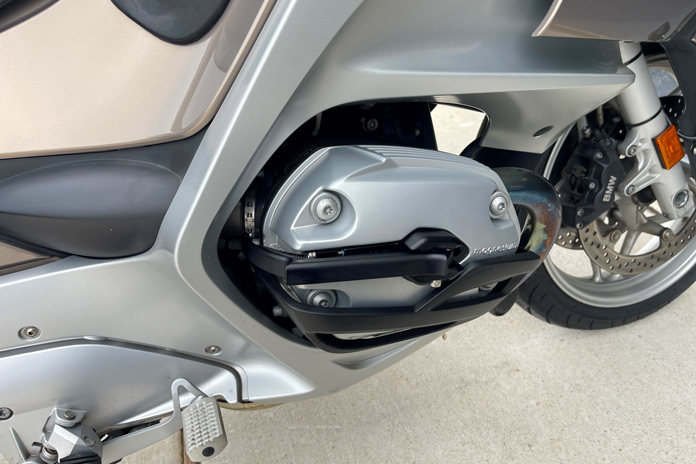
When not in use, these pegs can fold down to give the motor a stock appearance. The rider can deploy the pegs by swinging them outward with his/her boots, exposing a convenient 3-inch perch on which to rest weary feet.
When not in use, the IRM Moto Sahara highway pegs fold down and out of the way.
These pegs boast impressive mechanical engineering, which leads to a very simple installation process. The peg assembly consists of two pieces. A small, cube-shaped placeholder slides into the rear-facing valve cover recess, comes to rest on a ridge therein, and is shaped to allow the spark plug wire plenty of room. The main peg body then fills the hollow space in the valve cover over the ignition coil (where a black plastic protective cover normally lives) and mates with the aforementioned cube-shaped placeholder via four 7/64-inch stainless-steel hex bolts. After applying some blue Loctite to the bolts, they slide through the placeholder and into the main peg body. The bolts are then torqued down evenly in a star pattern with the included hex key, pulling both components together securely. Each peg takes about 10 minutes to install. The peg body components are all CNC machined and black anodized 6061 aluminum alloy. Quality of construction and materials is superb.
I tested the pegs on a scenic 2,500-mile spring tour of Texas, New Mexico, and Arizona aboard my 2008 BMW R 1200 RT test mule and came away impressed. The placement of the pegs is in the ideal position, allowing a neutral sitting position for extended periods of time – just perfect for lengthy highway stints. Actuation is easy since the leading edge of the peg facing the rider is flared outward and easy to catch with boots.
Other peg options for Hexhead RTs are generally much more expensive and cumbersome, involving buying tubular metal crash bars and then mounting conventional highway pegs to those. (Most quality crash bars for Hexhead RTs, for example, are at least two times the cost of these pegs – and that’s just for the bars without highway pegs included!) No other highway peg solution I know of is as neatly integrated into the OEM styling ethos of the BMW Hexhead R-Series as these American-made Saharas are. For $250 MSRP, the long-haul Hexhead rider can’t go wrong with these!
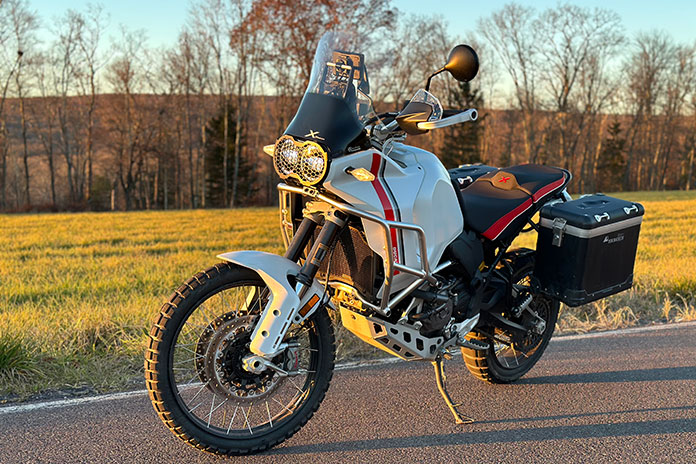
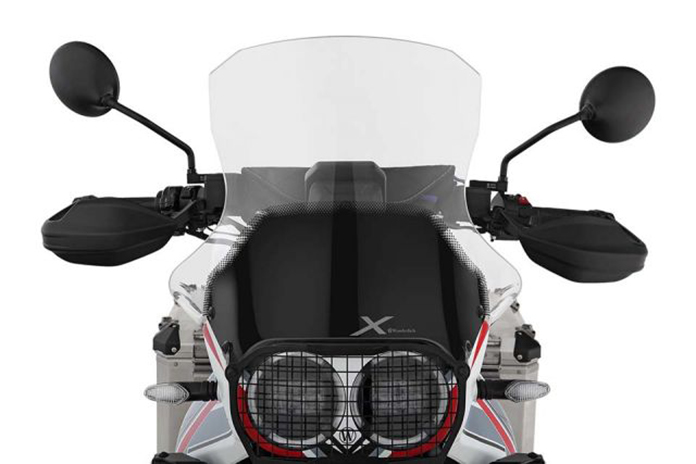
For this Ducati DesertX parts review, we added the Wunderlich Marathon windscreen and Aktivkomfort seat. Not seen here are the LED Microflooter 3 auxiliary lights, which require taking off the OEM crash bar for installation.
It’s often said that good things come in threes, but so do the challenging ones – especially when purchasing motorcycles. When it came to seeking out Ducati DesertX parts to upgrade, it was no different.
Reflecting on the motorcycles I’ve brought home over the past three decades, I’ve consistently upgraded three key components: the seat, the windscreen, and the lighting. It’s become almost a ritual, something I’ve come to term the “trinity crisis,” an inevitable part of every new or used bike purchase.
Seats and windscreens are a bit of a wild card, highly subjective to the rider’s preferences. A seat’s comfort can vary wildly depending on whether you’re decked out in full gear, just cruising in your everyday jeans, or if your back end has a bit more, um, natural padding. As for windscreens, your torso height, posture, and seat position drastically affect turbulence and buffeting.
When it comes to lighting, the discussion shifts. Here, it’s less about personal preference and more about safety under dark conditions, from night riding to longer tunnels to riding through a line of trees that create a dark canopy effect on the trail. And it’s not just about how bright your lights are but how far and wide they can throw their beams.
This brings me to my current favorite adventure bike — the Ducati DesertX. A beauty for sure, but not without its own trinity crisis. The stock seat was decent for a quick 80-mile jaunt. The windscreen did its job off-road and at slower speeds but on the highway? Not so much. And let’s not even start on the need for better night illumination.
Enter Wunderlich, a name synonymous with top-quality BMW accessories. To my pleasant surprise, the German company also offers a tailored lineup for the DesertX, including the Aktivkomfort seat, Marathon windscreen, and LED Microflooter 3 auxiliary lights.
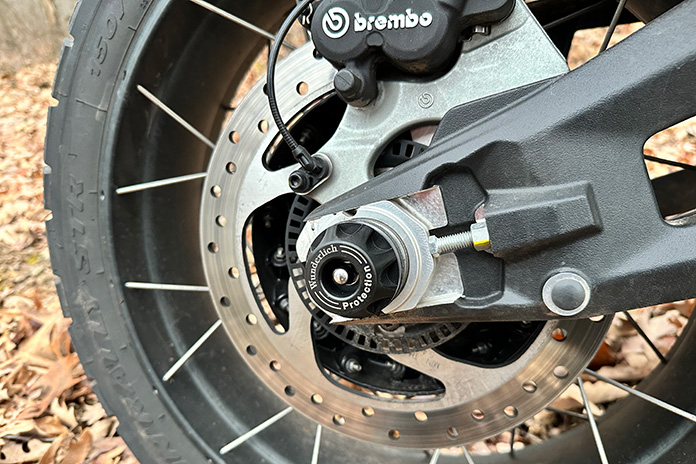
I put all three to the test, hammering the DesertX both on and off the road for 1,200 miles. And since the DesertX spends about 90% of its time off-road, I also added the Wunderlich axle sliders to keep things safe during those inevitable drops and crashes.
Market leaders like Corbin, Saddlemen, and Sargent have been my go-to for aftermarket seats. I’ve personally used each of these brands across my collection, including a heated Sargent seat on a Multistrada for well over 40,000 miles with zero complaints.
While researching the Wunderlich windscreen, I discovered the other Ducati DesertX parts, so I figured I’d pivot from the typical brands and test the Aktivkomfort seat, one of the first aftermarket seats for the DDX. The unique name caught my eye, as did the specs.
The seat is offered in standard, high, and low versions. I went with standard, which is about a half-inch higher than the stock seat of 34.5 inches. I have a 32-inch inseam and can flatfoot the DesertX with the OEM seat. With the Wunderlich, I am not fully flat-footed, something I’m used to after many years of riding taller bikes like the KTM 1190 Adventure R.
The Aktivkomfort focuses on an ergonomic 3D contour, which is claimed to promote a more natural posture than the OEM seat. The seats are constructed to prevent “buckling” of the padding, distributing sitting pressure evenly across a larger area. Wunderlich also makes another bold claim here, saying the design significantly reduces pressure on your behind and coccyx, the small bone in your lower spine that typically aches after long rides.
After the first few miles with the seat, I agreed with these two claims, and after 1,000-plus miles of riding, I agreed even more. The seat does take some time to break in. Mine felt better after 500 miles (likely less if sat more often, but I spend a lot of time standing off-road). Also, some wider seats are comfortable while sitting but push on the inner legs while standing. The Wunderlich Aktivkomfort is barely noticeable while standing.
Another notable feature is the ThermoPro technology, which keeps the DesertX’s seat up to 77 F cooler in direct sunlight during summer heat than standard untreated cover materials. This is a significant advantage over the OEM seat, which quickly heats up in the sun. And just like every Ducati, right legs tend to bake naturally, although the DesertX, by far, is my coolest-running Ducati. The cooler seat cover helps alleviate some of that feeling when the sun is beating on the bike, something that happens often in open off-road sections while standing for longer periods of time.
To further enhance comfort when riding in hotter conditions, the seats are made with a sweat-reducing cover material, combined with Alcantara pin-tucks and refined, dropped “cut” seams. These materials are not only durable but also offer, along with the shape, optimal grip for stability under hard acceleration and braking.
The seams are taped and welded using modern air welding machines, ensuring 100% tightness. The seat shell is constructed from high-strength RoburC material, indicating the high quality and durability of these seats.
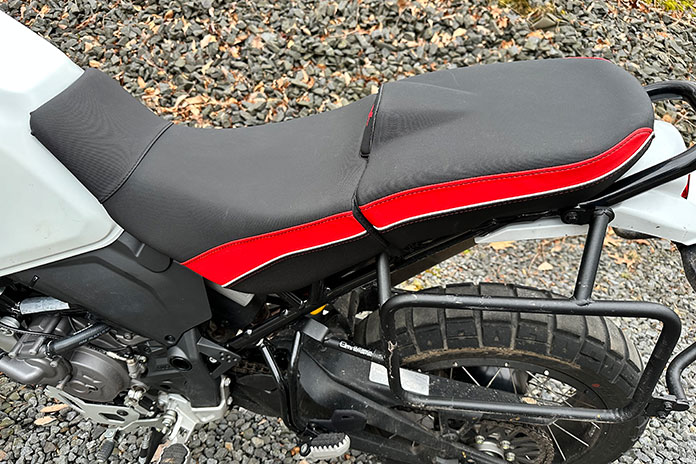
Overall, the Wunderlich Aktivkomfort seats are a significant upgrade over the stock OEM seats for both rider and passenger. By a long shot. It does take some time to break in, and a heated version would provide additional advantages for East Coast riders like me. Also, there may be some sticker shock; the rider seat sells for $600, and the passenger seat is $550.
The seat is offered in all black or the black and red version I have on my bike.
In stock form, the DesertX’s stock windscreen results in some buffeting at higher speeds. This is also attributed to the round mirrors, but the solution there is simple: Rotate the mirrors back about an inch, and that middle-chest blast on my nearly 6-foot frame subsided.
I tried the OEM touring screen, which helped with buffeting, making it tolerable even at highway speeds.
But the Wunderlich Marathon windscreen is by far the best option, offering significantly lower wind buffeting on the head and upper body. The results are a more comfortable and less fatiguing ride, particularly over long distances on highway rides.
The windscreen also complements the distinctive styling of the DesertX, enhancing the bike’s overall appearance by mimicking the stock screen’s looks.
Made from high-quality PMMA plastic, the Marathon is scratch-proof and UV- and petrol-resistant, ensuring durability and clarity over time. It measures 15.4 inches tall (stock is 14 inches), 14.3 inches wide at the top (stock is 8 inches), and 19.0 inches wide at the bottom (stock is 14.5 inches), with a thickness of about 0.2 inch.
Besides being larger, the key design elements that help buffeting are the more contoured profile and the bottom portion of the Marathon wrapping around the fairing more, helping push more air off the chest area.
The windscreen’s edges are hand-polished, eliminating the need for separate edge protection. This meticulous craftsmanship not only improves the windscreen’s aerodynamics but also reduces wind noise, contributing to a more enjoyable riding experience.
It also reduces vibrations, thus preventing muscle tension, especially on long routes. The consistent aerodynamic shape ensures a laidback, relaxed, and upright sitting posture, which is crucial for comfort during extended rides.
The windscreen is designed to seamlessly integrate with the DesertX’s cockpit and overall layout. It preserves and emphasizes the bike’s lines, underscoring its Italian character. This integration ensures that the windscreen does not detract from the bike’s special character but rather enhances it.
Installation is straightforward, as the windscreen can be easily swapped with the OEM unit. Have some patience, though, especially when positioning the washer that goes between the windscreen and the upper fairing.
As for pricing, the screen is available in clear or tinted and will set you back around $278.
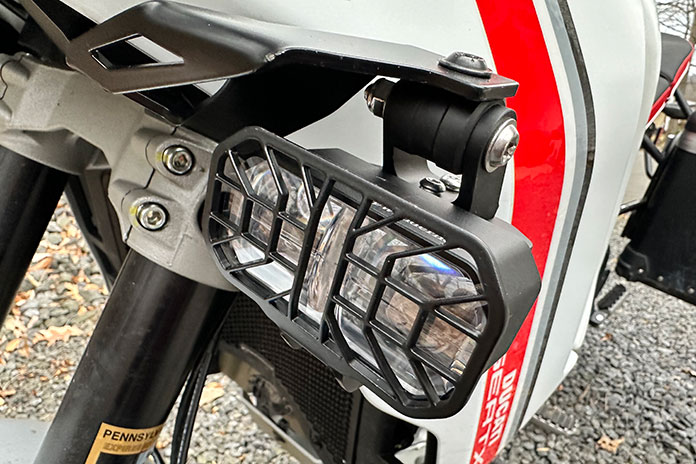
Ducati DesertX Parts: Wunderlich LED Microflooter 3 Auxiliary Lights Review
With the seat and windscreen covered, the next big upgrade to my DesertX was some extra lighting – a must for adventure motorcycles due to night riding and dark, tree-covered trails.
Compared to those on the market, the Wunderlich LED Microflooter 3 is one of the brightest currently available for the DesertX, providing an extra 8,000 lumens of light. And the absolute best part? These are designed for an easy plug-and-play installation with zero wire splicing. I hate playing with wires, and this quick install makes life simple.
You hook the wiring harness to the battery, route the wires (I ran mine along the left side of the trellis frame), and plug that harness directly into each light. There is also a third wire that you can run along your clutch line to your left controls that turns them off and on.
Take note: These only turn on when the bike is running. I have no clue how that works, but I thought I had some issues when I first attached it to the stock lithium battery.
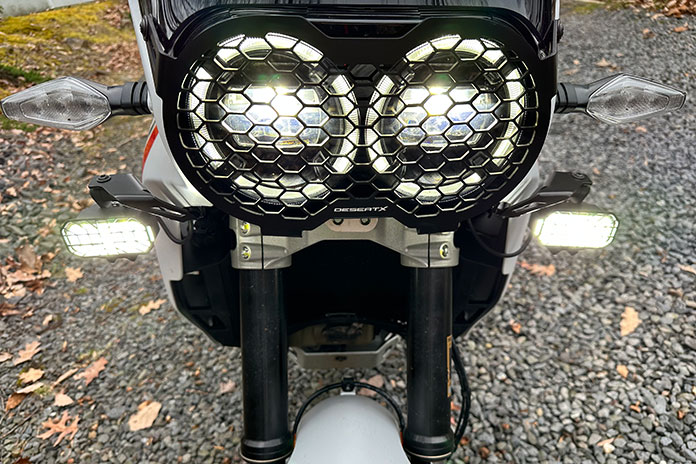
Each light houses two individual LEDs, ensuring not only an intense luminous flux but also redundancy – if one LED fails, the other continues to function, ensuring continuous operation. This dual-LED setup also contributes to the lights’ distinctive and recognizable illumination pattern, a signature feature marked with the Wunderlich brand logo.
The lights arrive with fold-down protective grids to not only protect from rocks, tree branches, or whatever else hits them but also for easy cleaning. Simply flip up the hinged cover and clean the lights.
They are operated via an illuminated handlebar switch, integrating seamlessly with the bike’s controls. The color temperature of the lights matches the main headlight, providing a uniform and realistic color spectrum that reduces rider vision fatigue during night rides.
The auxiliary lights significantly broaden the field of vision, especially in low-light conditions. They not only improve the rider’s visibility but also make the bike more noticeable to other road users thanks to their ability to optically enlarge the motorcycle’s front silhouette. This feature is crucial for enhancing both active and passive safety in a variety of lighting conditions, thereby reducing the risk of accidents due to poor visibility.
The Microflooter 3’s housings are made from black anodized aluminum, and the brackets are crafted from black powdercoated stainless steel, ensuring durability and resistance to the elements.
Another note: These don’t work with the OEM crash bars. I took my crash bars off to install them with the brackets but later reinstalled the bars. I am currently creating a bracket to attach these directly to my crash bars versus the brackets that are included.
Here are some stats:
Light output: Each headlight delivers an impressive 4,000 lumens, totaling 8,000 lumens.
Energy efficiency: Operating on 12 V/40 W.
Longevity: Approximately 100,000 hours of service life, equivalent to about 4,000 days.
Water resistance: IPX7 tested, ensuring performance in all weather conditions.
Integration: Specific brackets that blend with the body and are simple to install with four bolts (two on each side). But again, remember that these don’t work with Ducati crash bars.
These lights not only improve the riding experience but also significantly contribute to safety due to more visibility for other drivers and riders. With their easy installation – again, no wire splicing! – and impressive features, the Microflooter 3 lights at $600 are a worthy addition to any Ducati DesertX.
Ducati DesertX Parts Review: Concluding Thoughts
Each of these Ducat DesertX parts from Wunderlich not only addresses the “trinity crisis” but elevates the overall riding experience to new heights. They blend seamlessly into the DesertX’s design, enhancing its capabilities and, I argue, enhancing its aesthetics.
While the investment might seem steep at first glance, the value these upgrades bring to your riding experience is immeasurable. It’s like giving your DesertX some added superpowers – and who wouldn’t want that?
If you’re looking to transform your DesertX into a machine more worthy of long-distance travel while not sacrificing off-road worthiness, Wunderlich has got you covered. It’s not just about fixing what’s wrong; it’s about taking what’s right to a whole new level.
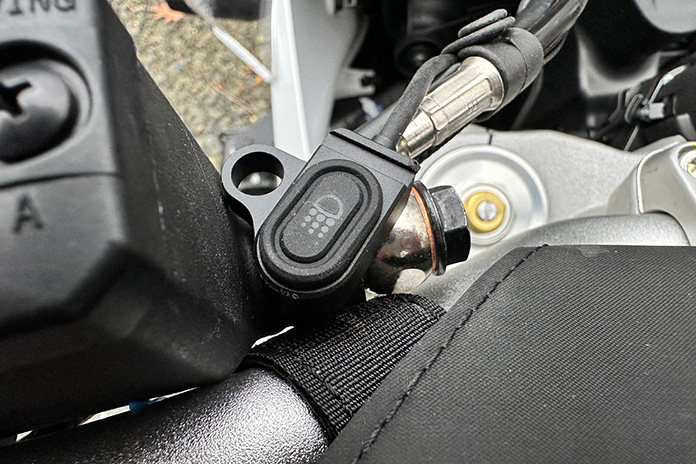
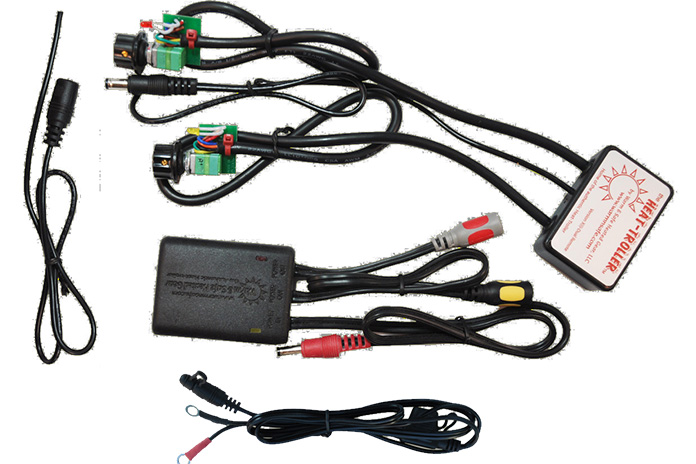
Warm and Safe Dual Remote Control Mounted Heat-Troller components
The Warm & Safe Dual Remote Control Mounted Heat-Troller provides riders with the ability to power and control two pieces of heated motorcycle gear separately. Remote versions are available, but this item is permanently mounted to the motorcycle for a cleaner interface and superior ergonomics since the controls are fixed in place.
The overall system consists of the Heat-Troller module, the remote receiver, and two fused wiring harnesses to connect the module and receiver to power. Installation is very straightforward: Simply use one of the fused wiring harnesses to connect the Heat-Troller module to switched power and the other harness to run power from the battery directly to the remote receiver.
On my BMW R 1250 RT test mule, I mounted the Heat-Troller module underneath a fairing panel. This method of connecting the module to the harness (as opposed to hardwiring it in) allows the fairing panel to be easily removed for service when necessary – an added plus! Finally, a pair of sealed temperature control knobs with LEDs (which are hardwired into the Heat-Troller module) are then affixed in a convenient location, such as the blank panels on my RT’s dash area.
Once installed, the only visible parts are the two temp control knobs and their corresponding LEDs, which provide visual indication for On, Off, and Polarity for your heated motorcycle gear. The knobs themselves have a tactile detent for On/Off and 300-degree rotation, so the rider can adjust from 3% to 100% power. The system can handle up to 15 amps at 13 volts, which is more than adequate to handle the typical heated jacket liner and glove combo at full blast. The device works from 7-16 volts and features internal resets for overloads and/or shorts.
On this device, the Heat-Troller module communicates wirelessly with the remote receiver, which is placed inside the jacket liner’s pocket. (The module and receiver arrive already paired up from the factory.) It is the receiver that makes the connection between the motorcycle’s battery and the input connections on the heated motorcycle gear via the power harness. This model has dual outputs, meaning two separate pieces of heated gear can be powered independently. Single output versions are also available.
I tested the Dual Remote Control Mounted Heat-Troller with a variety of heated motorcycle gear in my collection, including Warm & Safe’s Generation 4 heated jacket liner, an older Warm & Safe Generation 3 liner, an original Gerbing’s liner that’s 20-plus years old, a 10-year-old Gerbing’s Microwire liner, and a selection of gloves from Warm & Safe, Gerbing’s, California Heat, and others. It functioned flawlessly with everything I tested, and the compact receiver was easily stored in the left front pockets of all liners tested. There’s no reason why this Heat-Troller shouldn’t also work with almost any other brand of heated gear.
The Warm & Safe Dual Remote Control Mounted Heat-Troller has an MSRP of $169.90 and is covered by a three-year warranty.
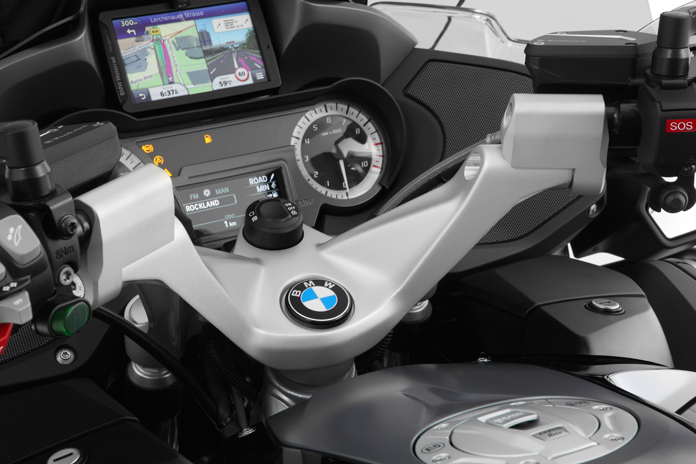
The BMW handlebar risers from Wunderlich raise the handlebar height 1.57 inches.
BMW R 1200/1250 RT sport-tourers, for all their stellar attributes, arrive from the factory with a cramped cockpit, even for height-challenged riders like me. Wunderlich’s BMW Handlebar Risers for water-cooled 2014-current RTs allow the rider to raise the baseline handlebar positioning by 1.57 inches, offering superior ergonomics to riders who prefer higher bars.
The kit arrives with everything required for installation, including the puller tool required to remove the handlebar from its stock position. First, gather your T8, T15, T30, T40, and T50 Torx bits, as well as a small flathead screwdriver, a 13mm wrench or socket, and a torque wrench. A 17-step installation procedure is included with the kit, but Wunderlich’s 20-minute video on the product website is much more useful for the DIYer.
To begin, remove the bar-end weights with the T45 Torx, and then remove the four T30 Torx holding the clutch and brake master cylinders on the handlebars. From there, a series of small Torx screws and tabs which hold the switch control housings in place are removed, the cable connectors are disconnected, and the housings are taken off the handlebar. The handlebar is now exposed and ready for removal via T50 Torx and the included puller tool, which requires the 13mm socket or wrench.
The Wunderlich BMW handlebar risers are then installed in the bar’s former position, and the handlebar is reinstalled onto the risers. To fit inside the risers, the paint needs to be sanded off the 0.5-inch leading edge of the handlebar. I used a bench grinder with a wire wheel attachment, which worked perfectly in under five minutes. Finally, the master cylinders and the switch housings are reassembled back onto the handlebar in reverse order.
Out on the road, it’s apparent that these German-made risers, which are machined out of solid aluminum and anodized to match the OEM finish, are of high quality. The risers themselves rotate on the handlebar, allowing an added measure of fine tuning. The addition of these risers, especially in conjunction with footpeg lowering kits (such as one from Suburban Machinery), allow the rider to really stretch out and sit inside the cockpit rather than on the motorcycle. Taller riders especially will be much more comfortable with this setup as opposed to stock. MSRP for the Wunderlich #31040201 Handlebar Risers is $374.95.
When it comes to stock motorcycles, the two items that owners are most likely to change – especially those who like to pile on the miles – are the windscreen and the seat. Folks typically want windscreens that offer more protection and seats that offer more comfort. The Yamaha Ténéré 700 is no exception.
We recently published our review of the Yamaha T7, an off-road-focused adventure bike with a long, narrow dirtbike-style seat. The stock seat has two parts: a long rider portion that slopes down from the tank to a low point and then up toward the separate passenger seat. The rider and passenger seats form a uniform surface, but it’s sloped rather than flat and is narrow and firm.
The Yamaha Ténéré 700 stock seat (photo by Kevin Wing)
Yamaha Ténéré 700 saddle from Seat Concepts
The rider portion height is 34.4 inches. Yamaha makes an accessory low seat ($129.99) that reduces seat height by 0.8 inch, but the lower height is achieved by eliminating much of what is already minimal padding. Yamaha’s accessory rally seat ($219.99) is 1.6 inches taller than stock, and it has a flatter surface and thicker padding. However, both of Yamaha’s accessory seats are just as narrow as the stock seat.
Seeking more comfort, we turned to Seat Concepts, a company based in Idaho that makes replacement seats for adventure and dual-sport bikes. I’ve had a Seat Concepts saddle on my KTM 690 Enduro R for the past five years, and thanks to its extra width under my bum and more supportive foam, I can do 300-mile days without ever thinking about the seat.
For the Yamaha Ténéré 700, Seat Concepts offers 12 different saddles, including Comfort, Comfort Sport Touring, Rally, and Rally Hard Adventure models, most in Standard, Low, and Tall heights with prices ranging from $264.99 to $389.99. Like the saddle on my KTM, the Comfort models are narrow in front where the rider stands over the seat during stops but wider in the back where they sit during normal seated riding.
We opted for the Tall Comfort One-Piece model ($369.99), which is 11 inches wide (1 inch wider than stock) and 35.7 inches tall (1.25 inches taller than stock). There are three cover options, all with faux carbon-fiber sides: Sand Paper Grip Top (our choice), Semi-Grip Top, or Diamante Vinyl Top.
After using the key release to unlock and remove the stock seat, the Seat Concepts saddle clicked perfectly into place, and it has a high-quality look and feel. Even with the grippy top, moving fore and aft is easy to do when wearing riding gear or jeans. The wider seating area spreads the rider’s weight over a larger area, providing a much more comfortable place to sit, yet it isn’t so wide that it interferes with moving back and forth during stand-up riding. The foam is firm yet supportive and holds up well even after long hours in the saddle.
The Seat Concepts saddle is a great addition to the Yamaha Ténéré 700 and will serve as a comfortable perch during our long-term test.
Gotta love that crystal-clear view through the SwitchBlade 2-Up Quick Release motorcycle windshield from National Cycle.
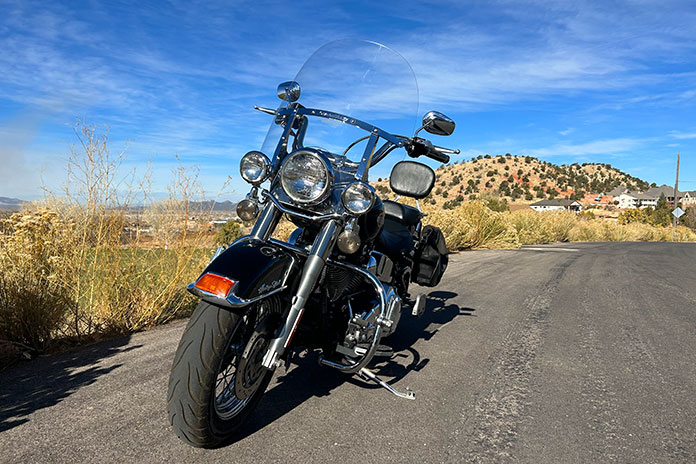
When I’m on my cruiser, I like the feel of air passing over me while riding backroads, but in the colder months – or when I’m on the interstate, which has a speed limit of 80 mph where I live – a windshield offers a pleasant reprieve that lets me enjoy other aspects of riding. My wife appreciates it too.
The factory windshield on my 2004 Harley-Davidson Heritage Softail was starting to yellow and haze, which can be a serious problem when riding toward the setting sun. It also had some pitting, not to mention a few unsightly scratches from an incident I’m too embarrassed to relate. The scratches weren’t directly in my line of vision, but they were still right up front, detracting from an otherwise nearly flawless 20-year-old bike. So I was excited when I discovered National Cycle made a replacement.
But let’s be clear (pun entirely intended), the SwitchBlade 2-Up Quick Release Windshield is more than just a replacement; it’s a step up. National Cycle has had various SwitchBlades in its lineup – including the shorter Chopped windshield – for about as long as my bike has been around. The 2-Up matches the dimensions of my stock windshield and, as the name implies, provides good wind protection for both rider and passenger.
The 2-Up is constructed of 4mm polycarbonate with National Cycle’s exclusive Quantum hardcoating for scratch resistance. In a Taber abrasion test, the Quantum hardcoating measured 10 times more abrasion resistant than FMR hardcoated polycarbonate and 33 times more than acrylic. National Cycle also claims Quantum offers 2.5 times more UV protection than FMR.
The difference in visibility between my old windshield and the SwitchBlade 2-Up (MSRP $409.95 with a three-year warranty against breakage) was immediately apparent and pleasing. Installation of the hardware ($110.95, sold separately and model-specific) was quick and easy, but I recommend saving your old hardware. The windshield installation directions specify that a “slight flexing” of the shield might be required to get the lower notches on the lower spools, but I couldn’t bend the shield enough before getting blocked by the stock light bar, so I had to use a couple of my old washers for the lower spools. Even then, I had to loosen the top lights on the bar to squeeze the shield over the main nacelle and between the light bar and the fork.
I’m a packrat when it comes to hardware anyway, and in this case, with such a tight fit, I was glad I saved the washers from my original windshield setup.
After making these accommodations, the windshield now pops on and off without any problems. I love the completely unencumbered view from behind the handlebar of a cruiser, but the SwitchBlade 2-Up Quick Release Windshield allows me to choose the wind protection when I want it, combined with a crystal-clear view that should last for another 20 years.
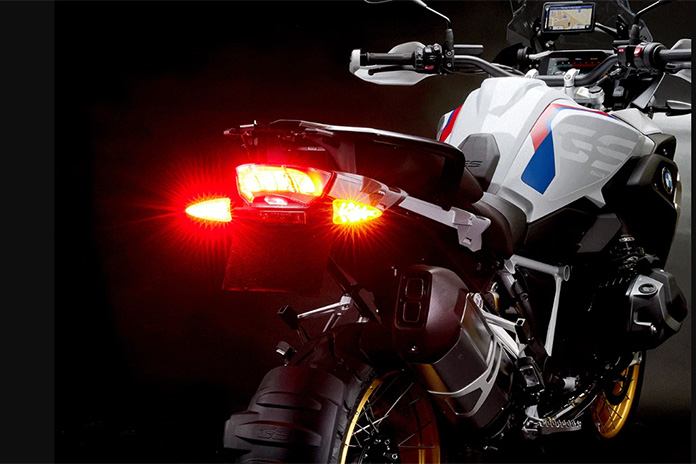
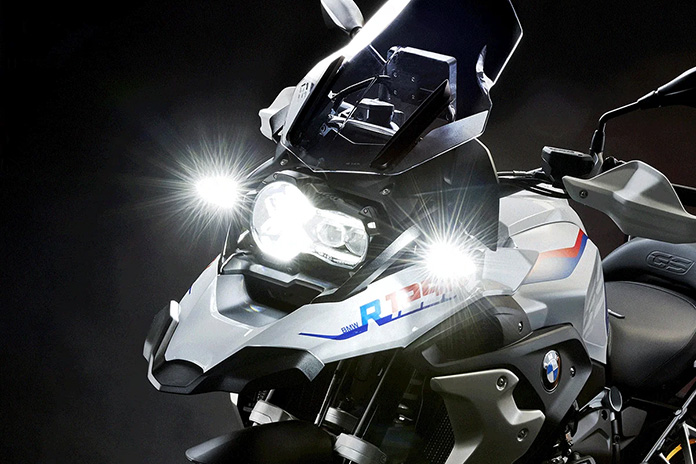
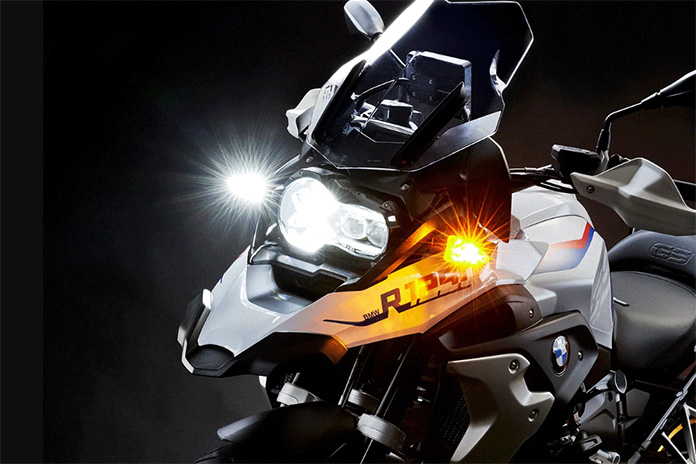
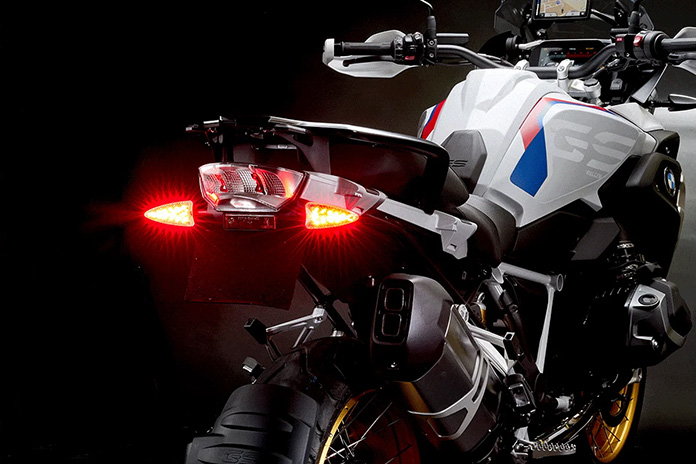
Weiser Technik’s Extreme EVO LED Motorcycle Light Kits transformed my 2020 BMW R 1250 GS test mule into a much more conspicuous presence on the road by adding running light capability to the front turnsignals and running light with brake light capability to the rear turnsignals. The kits essentially replace the stock turnsignal modules with Weiser’s own design, which utilizes 12 super-bright Osram LEDs per indicator. The result is dramatic, especially at night where the GS’s relatively meager stock lighting was once easily lost in the sea of traffic.
In addition to the 4 LED light modules, the Weiser LED motorcycle light kits arrived complete with all necessary components for installation – including standard wiring, extension wiring, zip ties, posi-twists, posi-taps, posi-locks, locking keys, and solid-state relay – and full instructions. Many variations of the kits are available to fit a myriad of brands and models, and generally the LED light modules fit within OEM housings. However, Weiser also offers the turnsignal housings themselves (if necessary), clear or tinted lenses, and short (4.2 inch), medium (4.6 inch), or long (6.25 inch) turnsignal stems to fit nearly any application.
The lights are fully CANbus-compatible, so no load equalizers are necessary, and there is no danger of fault codes if installed properly. Installation itself is relatively straightforward for the shade-tree mechanic using online tutorials and the printed manual that came with the kit, but since my bike was in for service already, I had my shop install everything in one hour of labor.
Pre-Weiser, my GS’s turnsignals were devoted solely to that function and otherwise remained unlit. With the Weiser kits installed, the front turnsignals now glow a constant bright white color as full-time running lights. Activating the turn signal overrides the white running light with a bright flashing yellow-off-yellow pattern and then glows continuously white again once the turnsignaling is canceled.
The rear setup operates in a similar fashion to the front, with both indicators operating as full-time red running lights. If the rider hits the brakes, both indicators glow an intense bright red. If the turnsignals are utilized, the side indicating glows in a yellow-red-yellow-red sequence until the turnsignal is canceled and then resumes its red running light mode. Hazard lights operate as normal, flashing yellow-off-yellow up front and yellow-red-yellow in the rear.
Out on the road, the Weisers drew plenty of compliments from my fellow riders, especially at night when the additional lighting really popped compared to the stock dim setup. The company claims their lights are up to 10 times brighter than OEM, an entirely believable claim based on my observations. The kits I tested carry a four-year warranty with tech support available by phone or online.
The Weiser Extreme EVO LED motorcycle light kits tested here are $249-$269 for both the dual-function front kit and triple-function rear kit or $449-$489 for a combo kit.
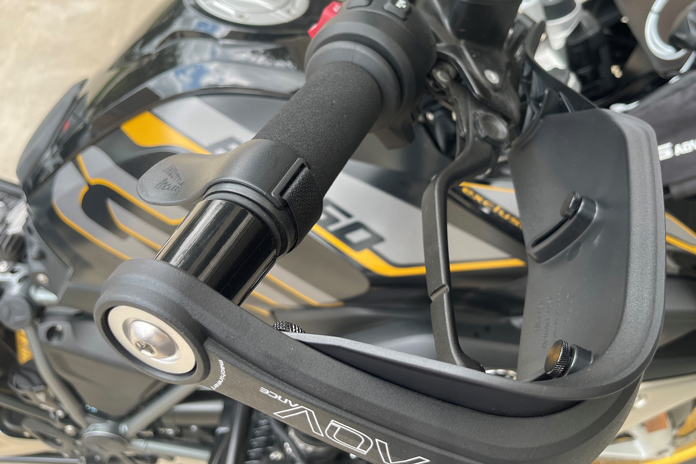
The Hudson Valley Motor Parts Motorcycle Bar End Weights provide a smoother and more enjoyable ride on my BMW R 1250 GS.
After nearly two decades aboard various generations of BMW’s venerable RT-Series sport-tourers, I recently decided to learn how to ride off-road and made the switch to a BMW R 1250 GS adventure-tourer The GS is surely a capable machine, but it’s not quite the glass-smooth operator my RT was on the highway. Though by no means offensive, the GS’s handlebar transmits a modicum of vibrations to the rider’s hands as the revs climb, and Hudson Valley Motor Parts Motorcycle Bar End Weights represent a compelling antidote to this. By adding copious mass to the bar ends, these weights effectively quell the sympathetic resonance which plagues all motorized two-wheelers to some degree.
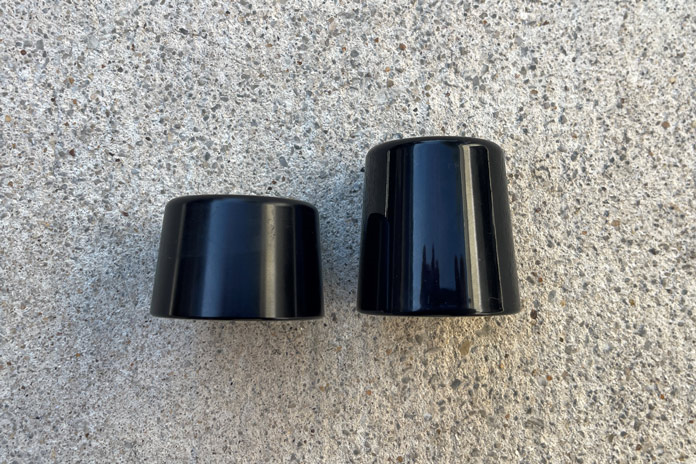
My HVMP test pair was perfectly finished in gloss black, with each bar end weighing a portly 8.9 ounces sans hardware and measuring 1.6 inches high by 1.5 inches in diameter at the base. For reference, the GS’s stock bar end weighs a scant 2.2 ounces sans hardware and measures 1 inch high by 1.5 inches in diameter at the base.
Stock BMW R 1250 GS bar ends (left) vs. Hudson Valley Motor Parts Bar End Weights (right)
Installation was a breeze and required only common hand tools. The GS’s stock bar ends must be removed by loosening the T45 Torx bolts which hold them in place. Then, they are replaced with the HVMP units, which are fastened via the included 6mm stainless Allen bolts. It’s a good idea to add some medium strength thread locking compound (Loctite or Permatex blue) to the bolt threads. Torque to 9 lb-ft, and you’re done. There is no interference whatsoever with the GS’s handguards, and the whole process takes less than 10 minutes for the pair.
On the road, the HVMP motorcycle bar end weights had a dramatic effect on handlebar vibes throughout the entire rev range. The GS’s handlebar is now dead still below 4,000 rpm, and the buzz which used to emanate from the grips above 4,000 rpm is now reduced by what feels like 75%, making spirited riding and downshifting much more enjoyable. My GS’s grips are smoother now than my RT’s in stock form ever were.
For the modest investment and effort required for installation, the HVMP bar ends are a worthy addition for commuters, long distance travelers, riders with carpal tunnel syndrome and other related afflictions, and anyone else who desires less buzz in the bars. HVMP offers a wide selection of its American-made motorcycle bar end weights for various BMW and other brand models.
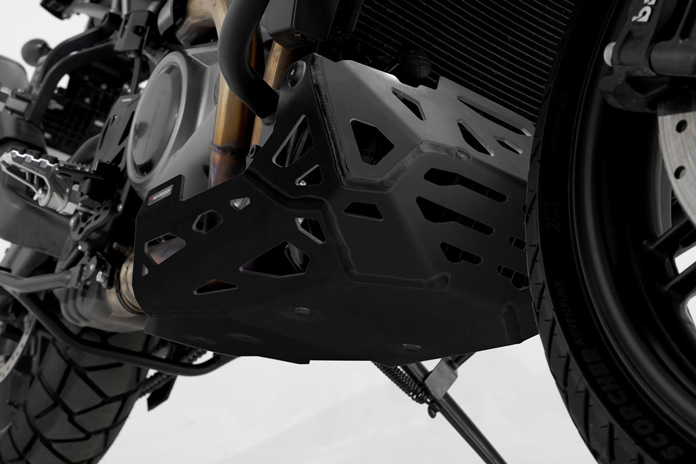
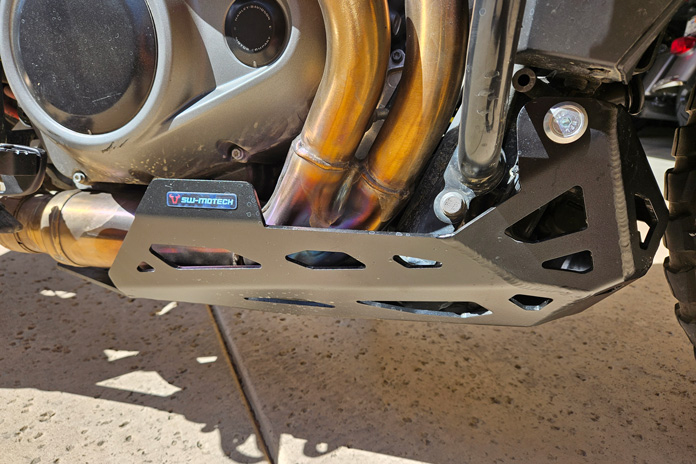
Harley-Davidson Pan America Engine Guard from SW-Motech (Photo courtesy SW-Motech; other photos by the author)
The popularity of adventure-touring motorcycles surged in the 2000s as more riders discovered their inherent versatility. So-called ADV bikes can not only eat up hundreds of miles each day but can also explore areas not frequented by most streetbikes. After a while, what many buyers of ADVs found was that there is potential danger to bouncing around the wilderness over rocks and logs, fording streams, and plowing through sand. One of those dangers is a punctured engine case many miles from help.
The Harley-Davidson Pan America 1250, a fully featured and capable ADV powered by a 150-hp V-Twin, was launched in 2021. It was an immediate success, and soon Pan Americas were finding their way into some very challenging terrain in deserts, mountains, and canyons, including single-track trails more suitable for smaller displacement dual-sport motorcycles.
The stock Harley Pan Am is a very capable motorcycle. However, from the factory, the undercarriage is woefully exposed to damage from rocks, logs, and other hard objects that can be kicked up when riding off-road. Harley-Davidson offers a robust accessory skid plate to replace the thin aluminum protector in front of the battery.
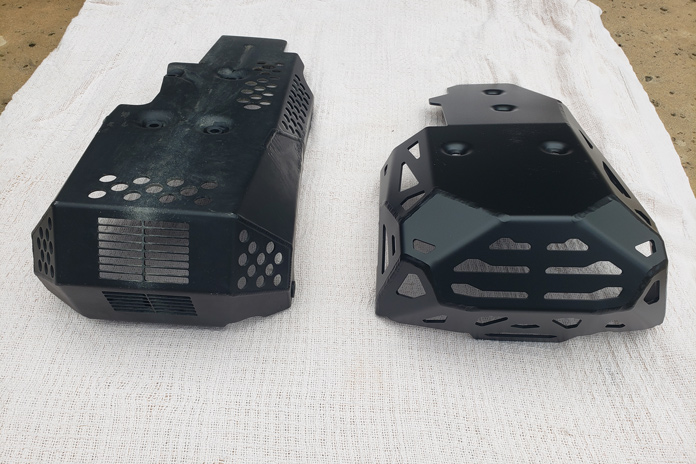
Harley-Davidson accessory skid plate (left) and SW-Motech Engine Guard (right).
The upgraded Harley skid plate is handsome, made from heavy duty aluminum and painted black. Using six bolts, it seemed to provide the level of underside armor needed for trails like Moab’s White Rim Trail and some of the Sierra Nevada trails that have sharp-edged rocks just waiting to end a ride should they puncture the nether regions of the engine.
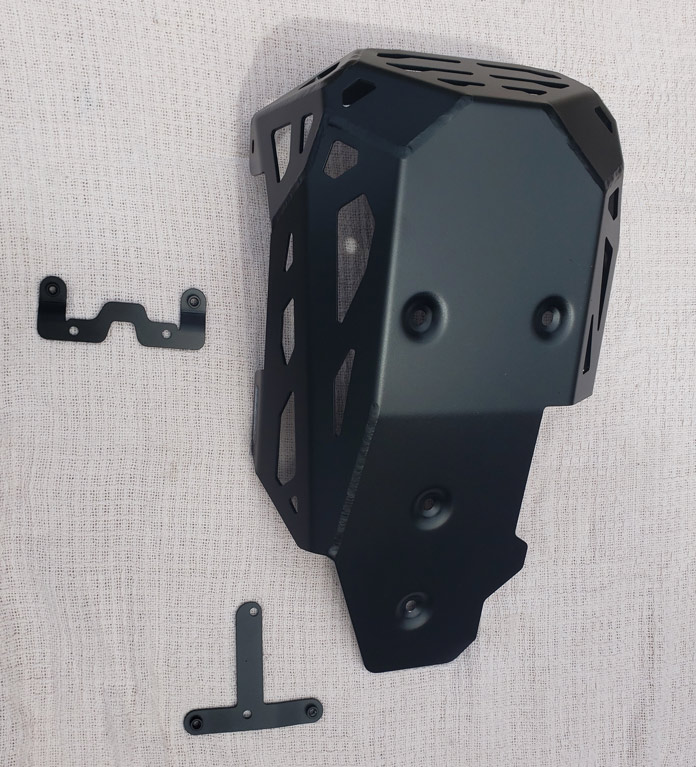
SW-Motech Engine Guard for Harley-Davidson Pan America
While the Harley skid plate provides protection – and the weight of it is held down low – it bolts right to the bottom of the engine rather than providing some sort of suspension to distribute the energy from a boulder or log hit.
Enter the Pan America Engine Guard from SW-Motech, which offers two key benefits over Harley-Davidson’s accessory skid plate. One is you can get it in either silver or black. Two, more functional and psychological support comes from the mounting system, which holds the engine guard off the bottom of the Pan Am’s 1250cc engine by about 0.5 inch with brackets that match up with the Pan Am’s original skid plate mounting holes. These mounts are able to provide a little more “give” should the engine guard be subjected to a heavy blow.
SW-Motech Engine Guard for Harley-Davidson Pan America
The bottom of the SW-Motech engine guard is smooth and will help slide over logs and boulders. There are ample cooling holes to help with airflow around the bottom of the engine while also providing an escape path for mud and water that might collect during a water crossing.
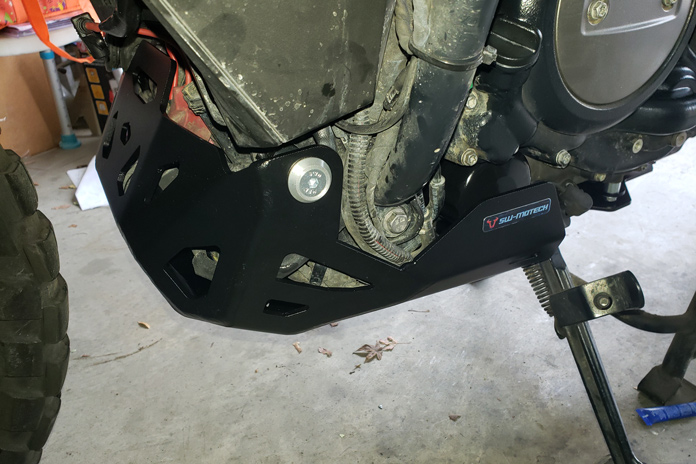
SW-Motech Engine Guard for Harley-Davidson Pan America
Installation took about 30 minutes. One mixed benefit to the SW-Motech engine guard is that it weighs less than the Harley skid plate. The SW-Motech engine guard weighs in at 7.4 lb, while the Harley skid plate weighs in at 10.7 lb. Although the overall weight reduction is good news, the Harley skid plate’s weight was at the very bottom of the engine and helped keep the center of gravity low. A few pounds doesn’t seem like much, but the change in weight distribution with the SW-Motech engine guard does shift the center of gravity up a little bit.
The Pan America Engine Guard from SW-Motech retails for $446.95.
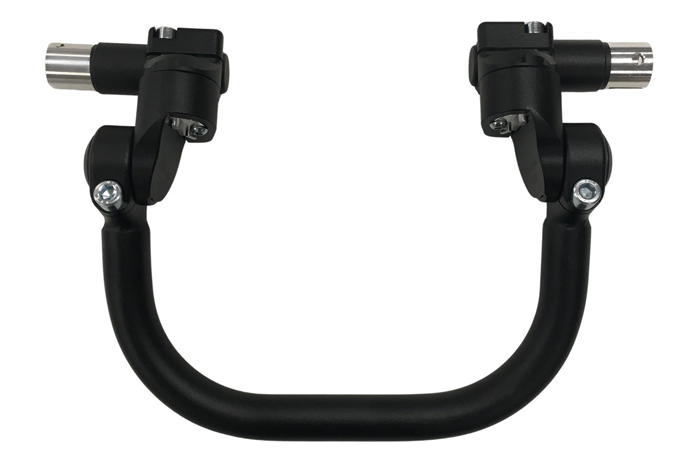
HeliBars Horizon HSTX handlebar for Can-Am Spyder F3 allows riders more adjustment to dial in their comfort zone.
The HeliBars Horizon HSTX handlebar for Can-Am Spyder F3 from model years 2015-22 allows riders to move the handlebar position 1.5-5 inches taller than stock and 1-4.5 inches rearward toward the rider. This adjustment potential gives riders better control and comfort for a more individual fit.
HeliBars has been making handblebars in America for more than 30 years. Based in Maine, the company is dedicating to helping riders find their perfect comfort zone. The company has bars available for most major manufacturers, and all products are backed up by a one-year warranty and a 30-day money-back guarantee.
This handlebar is great for short riders who want a shorter reach to the bar, and it’s also beneficial for taller riders to have the ability to dial in their preferred handlebar position. Compared to stock, the HSTX handlebar provides 30-degree forward and back wrist angle adjustment and fully adjustable reach. It works with OEM cables, wire looms, and hydraulic lines.
Installation is simple and requires swapping out the lower bent mounting tube and leaving the controls attached to the stock handlebar tubes. Then, re-attach them to the new mounting pivot. An install video on HeliBars’ website makes walks viewers through each step.
This handlbar part is specific to the 2015-22 Can-Am Spyder F3 and cannot be used on other models. However, HeliBars also has bars for other Can-Am models available on its website.